A little about me is that I'm a mother of two beautiful kids and married to my husband for over five years now. Our baby girl, Ella, will be turning two in January and our son, Caleb, is turning five next month. Which brings us to this post.
We're throwing a Super Mario Birthday Party! There are so many wonderful ideas floating around the blogosphere that while we'll still probably order some stuff from birthdayexpress.com, I am trying to do a lot of the decorations in DIY fashion.
The first project that I want to show you is something I'm pretty proud of.

I was inspired by to make this piranha plant by a birthday party I saw somewhere across the blogosphere that I can't find anymore and credit. There was never a tutorial on how to make it so I just jumped in with some paper mache.
Things I used to complete this project:
- Sunday edition of the Orlando Sentinel cut into strips
- An edition of the El Sentinel, also cut into strips
- tissue paper
- beach ball
- 1x2" board
- wrapping paper roll
- 2 screws and washers
- flower pot
- spray primer
- acrylic paints
- spray gloss sealer
- spray paint (for the pot)
- all-purpose flour
- water
The formula for flour paper mache seems to be 1 part flour to 2 parts water. That's what I started with but kept whisking in flour until I got to a consistency that was basically slightly thinned school glue.
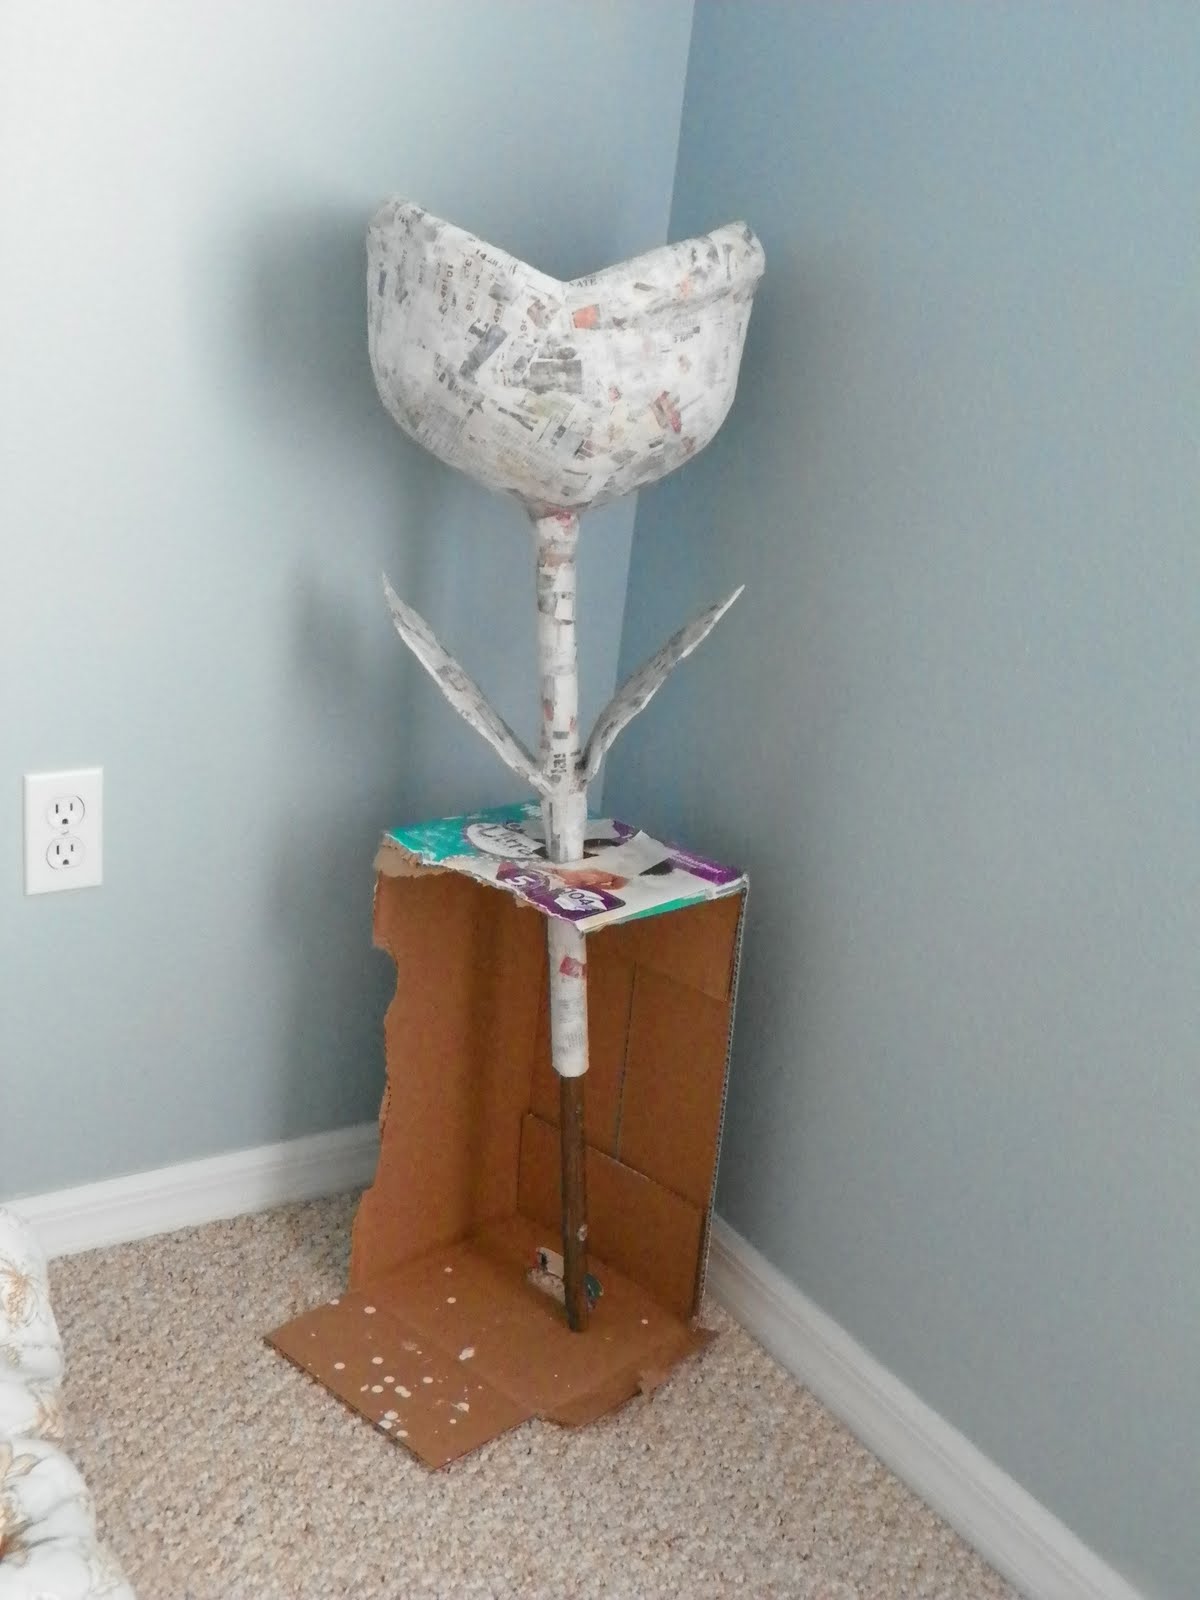
I started with the beach ball and went to town with the strips of paper and the glue mixture. I didn't photograph the ball inside of the head of the plant, but I left two strips of the beach ball free of paper mache to create the opening of the mouth. I put on maybe 4-5 layers of paper mache to make it super strong.
When that was completely dried, I took the ball out and added folded up tissue paper to create the base of the piranha plant's "lips."

Never mind my clubbed thumb.
I then added 2-3 more layers of paper mache over the tissue, trying to keep it as smooth as possible by using little strips.
When that was all dry I drilled two holes in the bottom middle of the plant and into my approximately sized 1x2" board that I've had around the house.

Attached the head to the board using two screws and washers.

I slide the wrapping paper tube over the 1x2. I made a leaf template by folding a piece of construction paper in half and cutting it out. I trace it onto some cardboard and cut two out. I attached the leaves on the broad sides of the stem using a little bit of masking tape.

I wrapped a couple of layers of the paper mache around the stem, attaching it to the head, over the screws and washers, and around the leaves. I stood it up to dry in my fancy dancy modified diaper box. (Whatever works, right?)
And I let it dry, and dry, and dry while I desperately wanted to attack it with some paint.
I sprayed it with white primer*, painted it using just the craft acrylic paint you can get anywhere, and gave it a glossy sheen with the final coat spray.
I made the white spots using a homemade stencil out of two sizes of cups and cardstock. I just cleaned up the lines afterwards.
The pot wasn't the right hue of green that I needed (sorry, no before pics) so I got some of Valspar's plastic spray paint in a better green. I weighted the pot down with some red lava rocks. Alternately, you could probably use a concrete form tube, cut to size and paper mached to resemble the green pipes of Super Mario Bros.
I plan on putting atomic fireballs in the head of the plant which is why I didn't add teeth. Those can easily be added by cutting out cardboard triangles, attaching with a little masking tape, and a couple of layers of paper mache.
My little guy LOVES it, so much so that its currently housed up on the shelf in my closet. Trying to keep little hands from it for another month! I had much of the materials on hand, so I spent less than $20 on this 3ft tall decoration.
*If I was doing this again I would use a gray spray primer instead of white. It took many many coats of red paint to cover the white primer. The white paint covered the red paint easily, so I imagine it would do the same with gray primer. You don't even need primer when painting paper mache, but I imagine it makes it a lot easier to cover the newspring.
I'm not sponsored by Lowe's, Valspar, or BirthdayExpress. Just things I use in real life.
Oh wow! That came out so nice- I love it! Thanks so much for letting me know, I'll be linking in the next Geek Craft Roundup.
ReplyDeleteWoah! This is outstanding. I need follow your post religiously from now on. I am a school teacher and I keep looking for such DIYs. There is a school carnival next month in one of the Chicago event venues and teaching kids how to make this beautiful thing would be a great idea.
ReplyDeleteüsküdar samsung klima servisi
ReplyDeletetuzla toshiba klima servisi
çekmeköy lg klima servisi
kadıköy toshiba klima servisi
pendik arçelik klima servisi
tuzla samsung klima servisi
tuzla mitsubishi klima servisi
çekmeköy vestel klima servisi
ataşehir vestel klima servisi